Customize Sublime text editor
February 12, 2014
Last year at the Fronteers conference in Amsterdam, Addy Osmani used Sublime Text Editor in his presentation. The editor looked really cool. Right after the conference I installed Sublime and looked around for packages which would make my life as front end developer easier and make editing more fun. After a month of playing with Sublime, I decided to leave TextMate (used it since 2005) and use Sublime as my new main editor.In this article I'll give you tips to configure Sublime to your needs, interesting packages, how to customize a theme and links to useful documentation. Let's get started.
Install Sublime Text Editor and packages
The official page of Sublime Text Editor is: http://www.sublimetext.com, you can find the downloads for OS X, Windows and Linux on: http://www.sublimetext.com/2. To make the most out of Sublime, the first package you want to install is the Package Control Manager. With this tool you can easily install useful packages. Follow the installation described on: http://wbond.net/sublime_packages/package_control/installation. The installation is really easy.
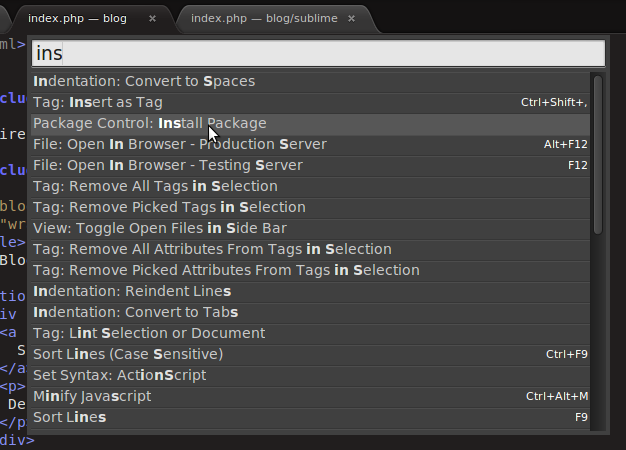
When the Package Control is installed, you can start installing packages you would like to use. Open Sublime and type in the following command:
- cmd+Shift+P to open the Packages directory.
- Type "install" and click on the search result: "Package Control: Install Package". In this window you can search for the packages you like to install.
I made a list of packages what makes programming more fun and my life as front end developer easier:
- Sass: syntax highlighting and tab/code completion for Sass.
- Sidebar enhancement: With this plugin you can do the basics via the sidebar, like new file/folder, edit, open/run, reveal, find in selected/parent/project, etc.
- Emmet: looks like a really awesome toolkit to improve your HTML & CSS workflow. Check out the documentation to see what it can do for you. I just read their documentation and installed it. I don't have experience with it yet, but it looks really promising.
- Less-Build: if you work with LESS I recommend to use this tool. It provides two build systems for '.less' files, both minified and non-minified. Requires lessc (via node.js) on OSX and Linux.
- LESS : syntax highlighting for LESS.
- Djaneiro : syntax highlighting and code completion for Django.
- HTML5
- HTML Snippets
- HTML Attributes
- SublimeHG : is a nice tool for Mercurial. I use it to see which files are changed, to write commit messages and pushing it to the repository.
If you don't work with LESS or Sass than you could use the following tool to create css prefixes and to minify your css/js:
Sublime customization
You can customize Sublime to your needs, like translating tab size to spaces, font size, line highlight etc. These customizations are stored in the user settings:- "Preferences > Settings-user" (on Linux), or
- "Sublime Text 2 > Preferences > Settings-user" (on OS X).
Here's a list of useful settings. You can check the default_settings for the complete list you wish to override.
    {
      "font_size": 11,
      "bold_folder_labels":true,
      "caret_style": "phase", // it will fade in and out rather than blink.
      "highlight_line": true,
      "ignored_packages":
      [
      "Vintage"
      ],
      "match_tags": true,
      // scroll_past_end is already set in default settings,
      // but on OS X, this value is overridden in the platform specific settings.
      // That's why you need to place this line in your user settings.
      "scroll_past_end": true,
      "translate_tabs_to_spaces":true,
      "trim_trailing_white_space_on_save": true
    }
Sublime Key commands
Sublime has a lot of cool and very handy key commands. The ones I use most are (on OS X):
- Opening The Packages directory: use the command cmd+Shift+P. All resources for supported programming and markup languages are stored here.
- Opening a file: cmd+P. Start typing the name of the file and you get a list of matched file names.
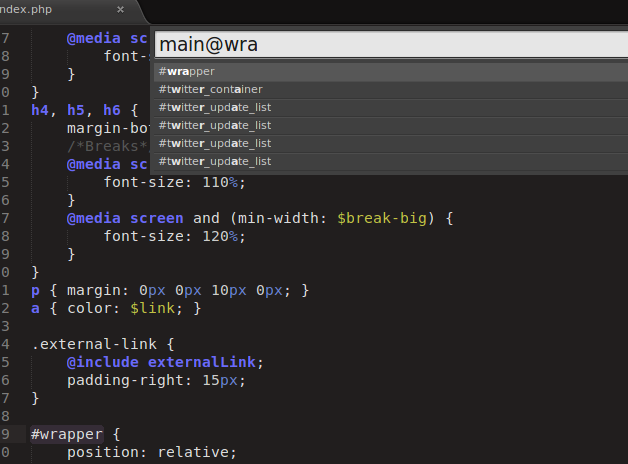
- Opening a file and search for a string: Use the command cmd+P and type [filename]@[string], for example: main@wrapper. It will open the file with the name "main" with a string "wrapper" in it. In my case the ".wrapper" class is in the "main.scss".
- Multiple selection: you will never use "find and replace" again. To add all occurrences of the current word to the selection, use Ctrl+cmd+G on OS X, or Alt+F3 on Windows and Linux.
- Split windows: you can split your window in multiple edit screens. To do so use the key commands cmd+alt+2, this split the window in 2 panels. It depends on the width of your screen how many split windows are useful to you.
- Emmet key commands: I tried some key commands shown on the demo site, but some of them didn't work, like creating a data uri. Most of these key commands are only for the demo. I found a list of working commands on: github
- Complete list of Sublime commands: check out the page on http://docs.sublimetext.info/en/latest/reference/keyboard_shortcuts_win.html
Open files via the terminal
I mostly use the terminal to navigate to folders and to open it in sublime. To use an easy command for it I created a symbolic link. In OS X the Application is in "/Applications/Sublime Text 2.app/Contents/SharedSupport/bin/subl". If it is in another directory use that path in step 2. Open your terminal and type in the following commands:
    $ cd /usr/local/bin
    $ ln -s /Applications/Sublime Text 2.app/Contents/SharedSupport/bin/subl sublime
That's it. You can now use the command "sublime" in your terminal.
Find your theme
Sublime comes with a couple of standard themes. If none of the default themes matches your personal color styles, you can find a lot of other themes on the internet. I use the Github version from Dayle Rees Color Schemes and made some changes in it. How did I do that?
- I installed "Dayle Rees color schemes" via Package manager.
- Then I opened the folder Browse Packages (via Preferences).
- Find the theme package and copy the theme file to your user directory in Browser Packages. In my case it was "Github.tmTheme". This is an XML file.
- Rename the copied file.
- Select your theme via Preferences > Color Scheme > User.
- Open the file in Sublime and play with the colors you want to change. I opened a CSS and HTML File side by side to see the effect of my changes.
- When you're done, you can just close the theme file.
I hope this article is meaningful for the people who want to start using Sublime. You can evaluate Sublime for free, and when you are enthusiastic about it, a personal license is only $80.